The following guide is designed to provide an introduction to the call recording search and playback features of the MiVoice Office Application Suite.
The recordings page provides access to search for recorded calls. The page is split into two sections; on the left side are search tools that can be used to search for specific calls or types of calls. On the right side is the recordings grid, this shows a list of all calls that match the current search criteria.
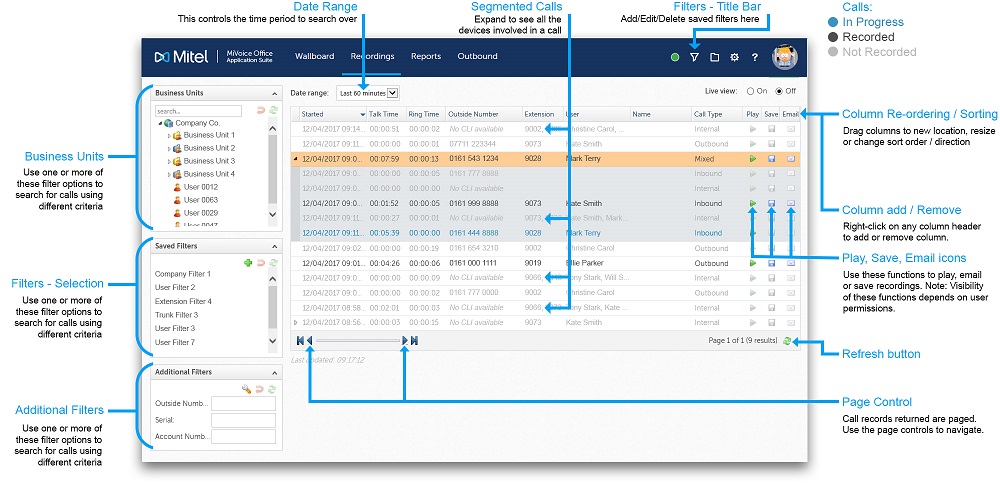
The system creates a new call segment each time a call rings or gets answered by a different device on the telephone system. To help locate calls, they are grouped together so that a call's route through the telephone system can easily be tracked. The image above shows a segmented call that has been expanded to display each call segment.
The color of the text in the recordings grid denotes its status. Blue text indicates that a call is currently in progress on the telephone system (with the correct permission, these can be listened to live). Gray text indicates that a call was not recorded. Black text indicates that a call was recorded and is now finished.
There are numerous reasons why a call may not have been recorded, hovering over the play icon with the mouse will display a tool-tip which will indicate why a call was not recorded.
The date range is used to select the time period to search for calls to show in the recordings grid. A limited number of calls can be displayed in the call grid, if the date range to be searched is large, it is recommended that additional filters are also applied to reduce the number of calls returned by the search.
Using the search tools on the left side of the screen, it is quick and easy to find specific calls. The 'Business Unit' section can be used to search for calls for specific users or departments. The 'Saved Filters' section can be used to apply a filter that you or someone else has previously created. The 'Additional Filters' section can be used to create single use filters. One or more of these methods can be used to reduce the number of calls displayed in the recordings grid. Remember to use the refresh button  to apply any new filters.
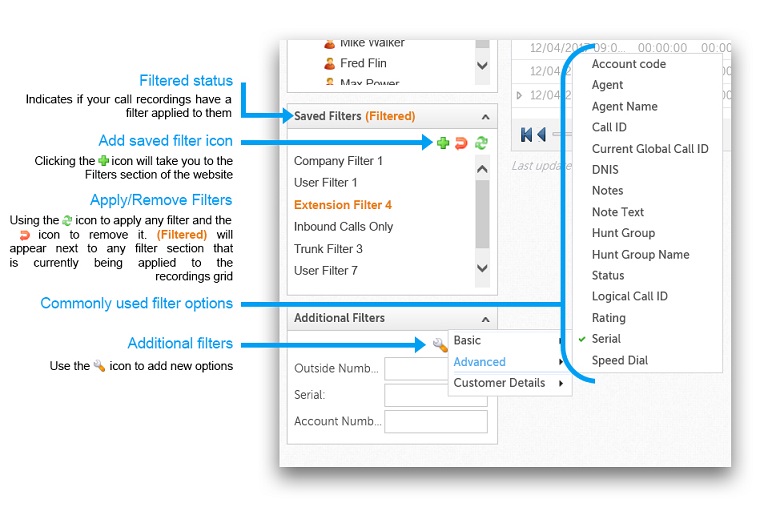
This section shows the business units (departments/teams) and people within the organization. Applying a filter for a specific business unit will filter the recordings grid to show only calls made by people that are a member of the unit. Alternatively, individual users can be selected. Select more than one user by holding down the Ctrl or Shift key and selecting the users required.
Each user's personal filters and filters that have been shared by other users will be visible here. These can be applied to the recordings grid as required. To manage filters, navigate to the filters section ( ) of the website using the main title bar.
The most commonly used ad-hoc search criteria are displayed by default. Text can be entered into any of options displayed and applied to the recordings grid using the refresh button  . Search options can be added or removed from this section using the spanner
  .
.
Access to recordings and recordings management (Playback, Save, Email) can be strictly controlled using security profiles. Depending on the profile assigned, not all calls may be displayed in the recordings grid. If you cannot find a specific call, please contact your system administrator to ensure you have the correct permissions.
The playback window will show whenever the play icon is selected in the recordings grid. The call details tab provides all the data the system has stored about the call. The segment selector in the top right of the page can be used to look at the details of individual segments. The (Agg)regate option shows the durations for all segments added together.
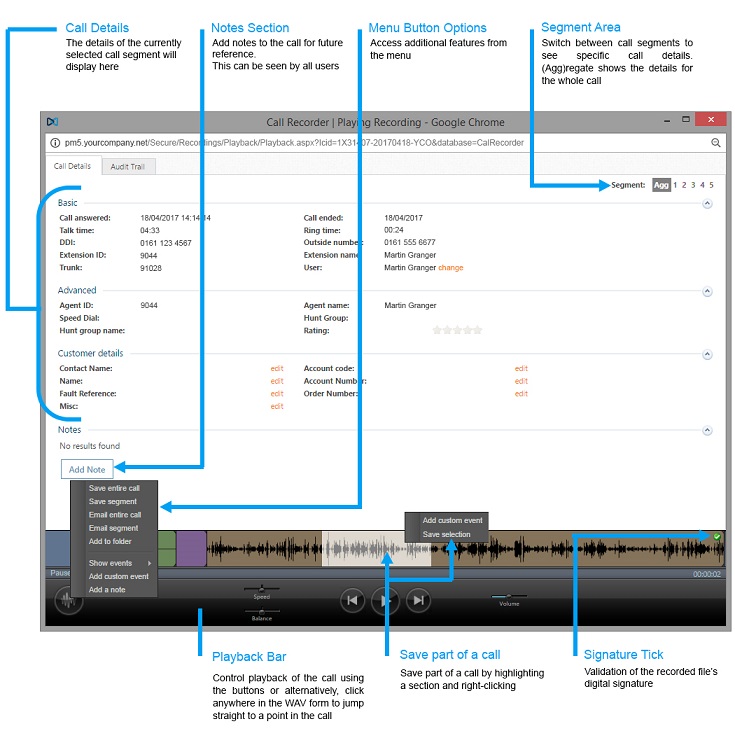
Each segment of call is displayed along the bottom of the playback window in a different color. Playback of calls can be controlled using the media control buttons or by simply clicking at different locations along the timeline. The black lines within the colored segments is the 'Waveform' for the call. It indicates the existence of audio within the call. If a segment is displayed without any waveform at all, it has not been recorded.
Entire calls or segments of calls can be saved or emailed to internal or external parties. Clicking the button in the bottom-left of the playback window displays the email and save call options. Alternatively, a section of a call can be saved by highlighting and right-clicking. Selecting 'Save selection' from the menu will save only the section of the call that has been highlighted (See the image above).
Each user has their own folder structure that can be used to store important calls. Selecting the 'Add to folder' option from the bottom-left menu provides access to store the current recording for future reference. Folders can be accessed by clicking on the folder icon on the title bar.
The system stores events information about all calls on the system. Events stored include; hold/retrieve, pause/resume and account code entry. In addition, users can add their own custom events to mark specific time lines within a call which they can then refer to later. Events can be accessed through the bottom-left menu on the playback bar.
The audit trail tab shows historical information about when calls are accessed and by whom. This includes when calls are played back via the user interface or when they are saved or emailed.
The title bar provides access to areas of the App Suite. The image below outlines each of the navigation icons:
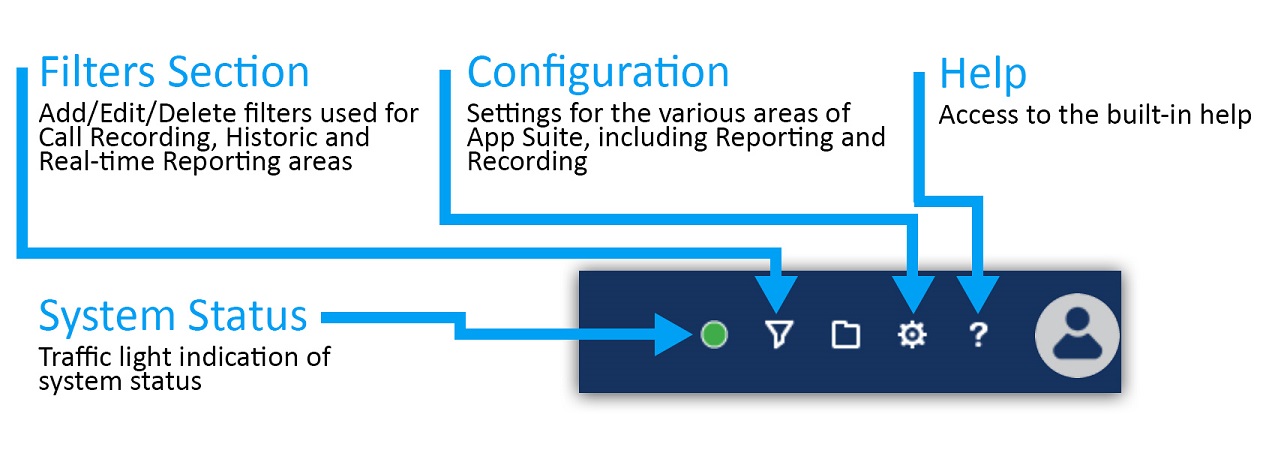
The configuration section and system status will only be visible with the correct permissions.
The 'Filters' section of the website is used to manage all the saved filters on the system. Filters can be used with reports or recordings.
Each user has their own 'My Filters' section that provides a list of all filters they have created.
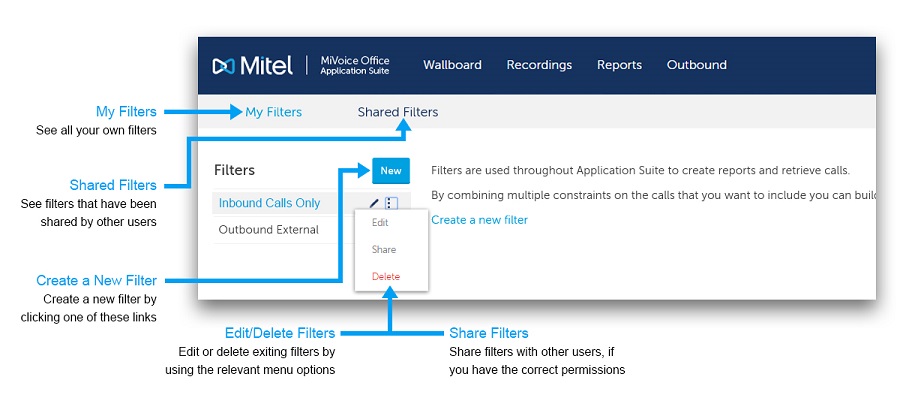
Filters can be shared between users to avoid duplicating work and to allow administrative staff to set up filters that can be used by everyone.
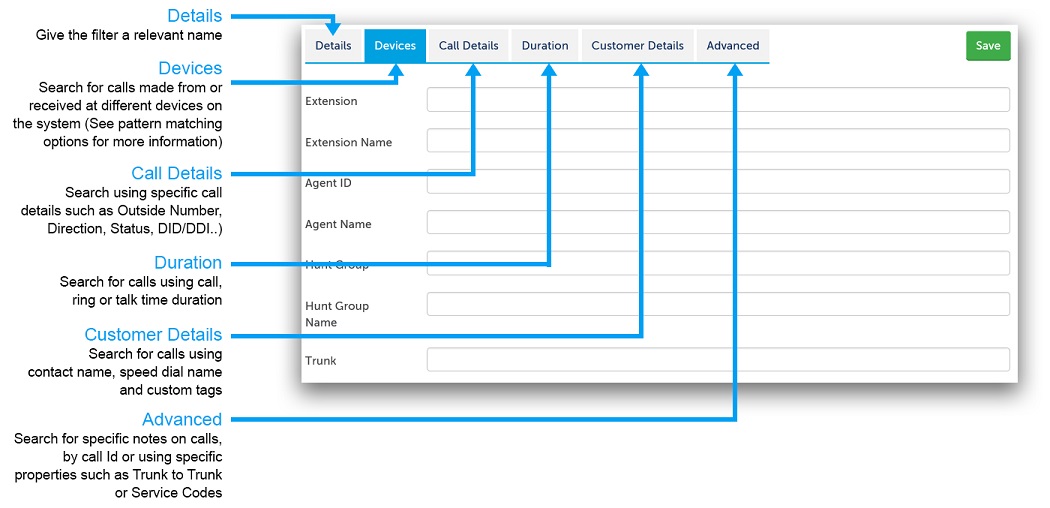
Each filter provides the ability to search on one or more details about a call. The details are grouped into tabs. The tabs are displayed with descriptions in the image below:
The use of special characters within the text boxes for a Filter enables the use of complex filter strings.
The following characters are supported:
| Special Characters | Description |
|---|---|
| Exclamation mark (!) | Not equal to |
| Percent (%) | Fuzzy matching (equivalent to a SQL LIKE %) |
| Underscore (_) | Fuzzy matching of a single character |
| Comma (,) | Can be used to search for multiple values at the same time |
In addition to the special characters above, the following characters are supported when searching using a device based field (Extension, Agent, Trunk, Hunt Group):
| Special Characters | Description |
|---|---|
| Plus sign (+) | Greater than or equal (e.g. 1000+ for extensions greater than or equal to 1000) |
| Hyphen (-) |
Delimits a range of values to match (e.g. 1000-2000 for all extensions between 1000 and 2000 inclusive) |
The example below shows what would be matched when entering combining multiple special characters using a comma:
Matching endpoints: 1000, 1001, 1002, 1004, 1005, 1040, any that start with 18 and end with a 5, any with a value greater or equal to 2000.