
MiVoice Office Application Suite - Technical Manual
6900 Handset Deployment
The following list outlines all the steps involved in deploying 6900 series handsets:
Phones should be deployed straight to site and not pre-staged. If pre-staged, a phone will need to be reset to factory default or the IP address of the configuration server will need to be manually updated so that they can find the MiVoice Office Application Suite server on it's new IP address.
This is because the phones use HTTP/HTTPS to communicate with the MiVoice Office Application Suite server after their initial boot and the address of the server is persistently stored on the phone.
The following configurations should only need to be performed once. Stages 2 & 3 will need to be repeated for each new 69xx phone deployed.
When using release 6.3 SP1 or higher of the MiVoice Office 250, MCS has the ability to query all SIP Authorization Credentials from the telephone system to use with Phone Manager Softphones and 6900 phones. This integration simplifies the process of installing Softphones/6900 phones and minimizes the risk of mis-configuration.
To support this feature, a new configuration section within MiVO 250 Database Programming has been created:
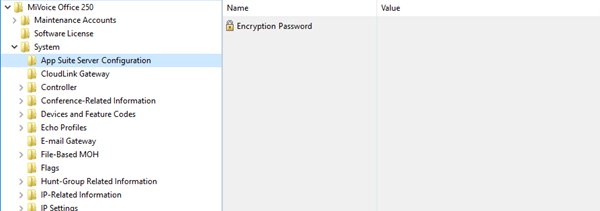
On each node in the MiVO 250 network, an Encryption Password needs to be configured which will allow MCS to query and decrypt the SIP authorization credentials.
If the password is not configured, MCS will not be able to query the credentials from the PBX and they will have to be configured manually. See the Device Configuration section for more information.
Once the encryption password as been configured on the telephone system(s), it must also be configured in the Nodes section of the MCS configuration website.
The MCS server needs to provide each 6900 phone and Phone Manager Softphone with the IP address of a SIP server to register with (the MiVoice Office 250). The IP address required will depend on which MiVoice Office 250 node the SIP extension is configured on and whether the phone is local or a teleworker.
For each node on the MiVoice Office 250 network that MCS is connected to, it is important to configure the IP address/port number to be used for SIP registrations.
For information on configuring the IP address(es)/Ports for each node, please refer to the Node Configuration section.
Each handset will require a keymap and configuration profile. The MCS comes with default keymap and configuration profiles with the most commonly selected options already added. These can be customized as required or new profiles can be added to suite the customer's company wide or department needs.
Stage 1 is now complete - continue to Stage 2 - Create 69xx SIP Devices
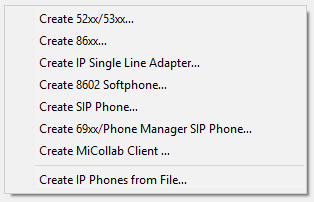
From release MiVO 250 6.3 onwards, a new SIP phone type called '69xx/Phone Manager SIP Phone' (renamed from '69xx SIP Phone' in 6.3 SP2) is available for creating SIP extensions on the telephone system for use with Phone Manager softphones & 6900 phones.
When SIP extensions are created using this type, the SIP Phone Groups created will automatically be configured with the required settings and will have a default inbound authentication applied with a randomly assigned password.
Stage 2 is now complete - continue to Stage 3 - Phone Deployment
Once all the preparation work has been completed on the telephone system and MiVoice Office Application Suite, the phones can be deployed. Out of the box, all 6900 phones are shipped with MiNET firmware. The MiVoice Office Application Suite has a built in TFTP server that will provide the phones with SIP firmware the first time they connect.
The phones must be provided with the address of the MiVoice Office Application Suite so that they can download the SIP firmware and subsequently, their SIP & softkey configuration so that they can connect to the telephone system.
The sections below outline the methods available for phone deployment:
The easiest way of providing 6900 phones with the address of the MiVoice Office Application Suite is using the Multicast DNS auto discovery (by default, this is enabled on the MiVO App Suite v5.1.14 or later). If the phones are not provided with a DHCP option then they will perform an 'Auto Discovery' to find the configuration server.
Once the phones have been provided with the address of the MCS server, they will contact the server and the registration process (and any firmware updates) will begin. The phone will reboot a number of times during this process. The phone will now be registered with the MCS server and display a red Setup screen shown in the next section.
Continue to the Initializing Handset section.
If the phones are on a different subnet to the server, DHCP can be used instead. Please review the section below if DHCP is being used paying specific attention to the information on removing options 43 & 125.
If using DHCP to provide the phones with the address of the MCS server, it is recommended that the following DHCP options are used:
Using these DHCP options will allow 5300 & 6900 phones to work alongside each other on the same network using the same DHCP server.
Configure Option 66 in your DHCP server with the IP address of your MCS server.
For specific information on configuring the MiVoice Office 250's built-in DHCP server, please refer to the 'MiVoice Office 250 DHCP Configuration' section.
When using option 66 on a DHCP server, it should be configured as an ASCII parameter containing an IP Address (not an IP Address parameter). This includes the built in DHCP server of the MiVoice Office 250.
The 6900 Handsets will also pick up the following DHCP options and use them as the configuration server address (in the order listed):
If any of these options are already in use on the DHCP server then it will overwrite the configuration server used on the handset and could stop it working. One possible source for causing a conflict is DHCP options for 5300 phones using option 43/125. These can be changed to use the preferred options 128,129 & 130 to avoid conflict.
Remove options 43 & 125 from the DHCP if they are there so that the 6900 phones do not pick up the phone system's address.
Once the phones have been provided with the address of the MCS server, they will contact the server and the registration process (and any firmware updates) will begin. The phone will reboot a number of times during this process. The phone will now be registered with the MCS server and display a red Setup screen shown in the next section
If you have this continue to the Initializing Handset section.
If the phone displays the following screen instead of the red setup screen, it has connected to the MiVoice Office 250 via MiNET.
If this happens, the phone has not been passed the IP address of the MiVoice Office Application Suite and the DHCP configuration is incorrect. Once the DHCP configuration has been fixed, restart the phone. DO NOT enter a PIN at this point.
Now bypass Manual Configuration section below and move on to the Initializing Handsets section.
DHCP is the preferred method to automate Firmware update and Configuration setup as it reduces the number of steps involved.
If you cannot use DHCP then follow the steps for manual setup below
Out of the box, all 6900 handsets now come with combined SIP/MiNET firmware installed.
Select "Manual Configuration" from the boot menu:

Enter the admin pin (22222) when prompted. You will then be presented with the "Configuration Server" form:

Enter the configuration details to point the phone back to the MCS server:
After a reboot, the phone will connect to the MCS server.
The phone will now be registered with the MCS server and display a red Setup screen shown in the next section.
continue to the Initializing Handset section below.
Once a handset makes it's first connection request to the MCS, it will be in 'Unassigned' mode. This means the MCS server is aware of the handset, but does not know which SIP extension on the telephone system it should be configured as.
The screen of the phone should match the screen shot below:

Handsets can be initialized by using either (a) the 'Setup' button on the phone, or (b) editing the handset on the 'Phones' page of the MCS website:
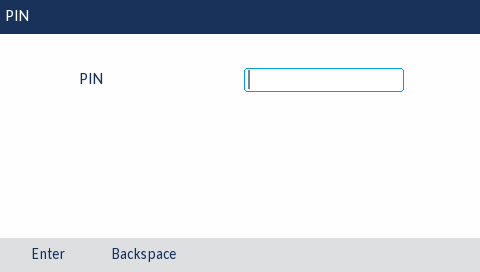
(a) To use the setup process on the phone, press the 'Setup' button and enter the setup PIN (default ***). The handset will then prompt for the extension number. Once the extension number has been correctly entered, the MCS server will pass the handset all SIP, keymap and configuration information it requires.
(b) To use the configuration in MCS, browse to MCS Configuration -> Features -> 6900 Handsets -> Phones. Locate the MAC address of the phone in question and Edit the record to add the SIP extension number.